

gluten free mango cake recipe better homes and gardens
This post contains affiliate links. Please read my disclosures.

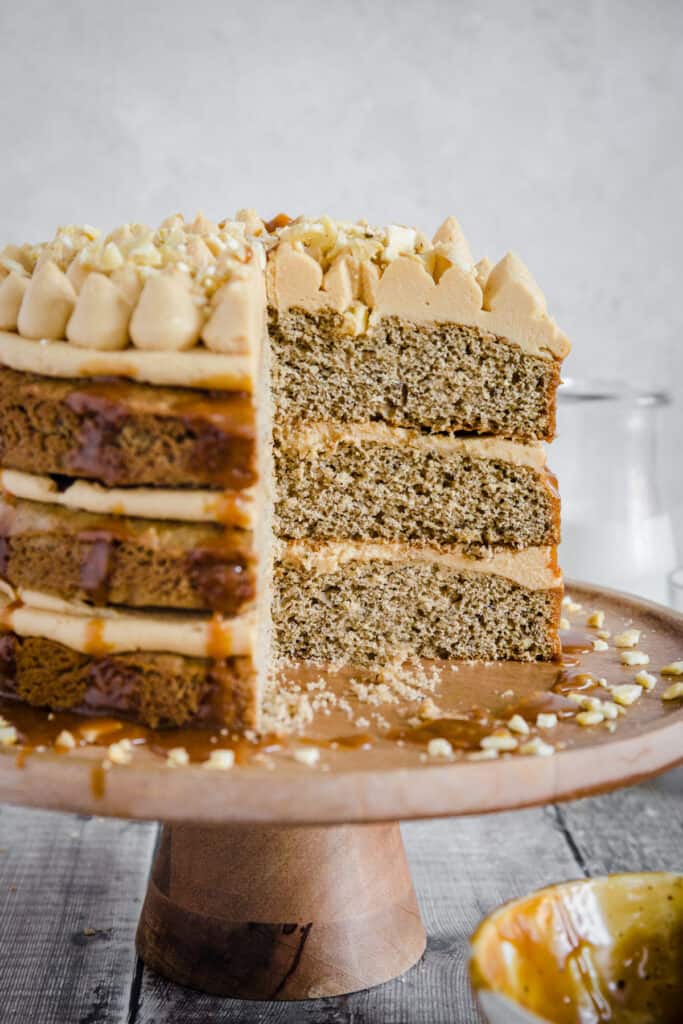
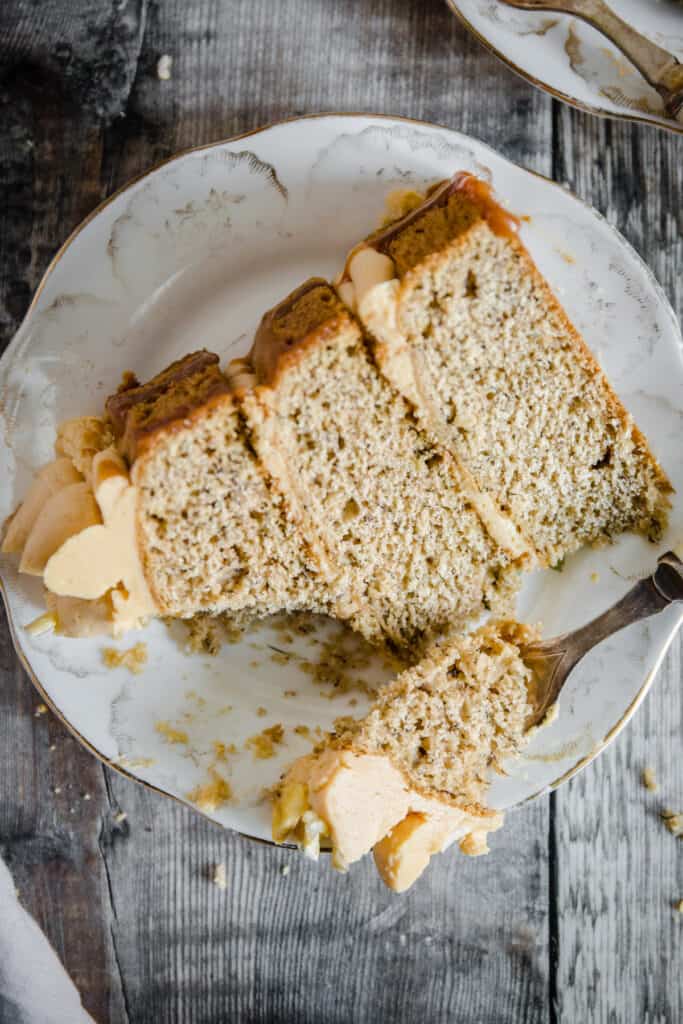
This 3 layer Gluten-Free Sticky Toffee Banana Cake is a real showstopper of a cake. Enjoy a fluffy and gently spiced banana sponge cake filled and decorated with a gorgeously light and silky ermine buttercream infused with rich toffee sauce. Just 1 gluten-free flour and no xanthan gum makes this a foolproof cake for first time gluten-free bakers.
When you want a cake to make a real impact then three layers will give you the wow factor you are looking for. This Gluten-Free Sticky Toffee Banana Cake has magnificent layers of soft and tender banana sponge, sandwiched together with a creamy toffee buttercream, decorated with a deceptively easy piping and drizzled with a homemade sticky toffee sauce. You can be sure this cake will be a real crowd pleaser.
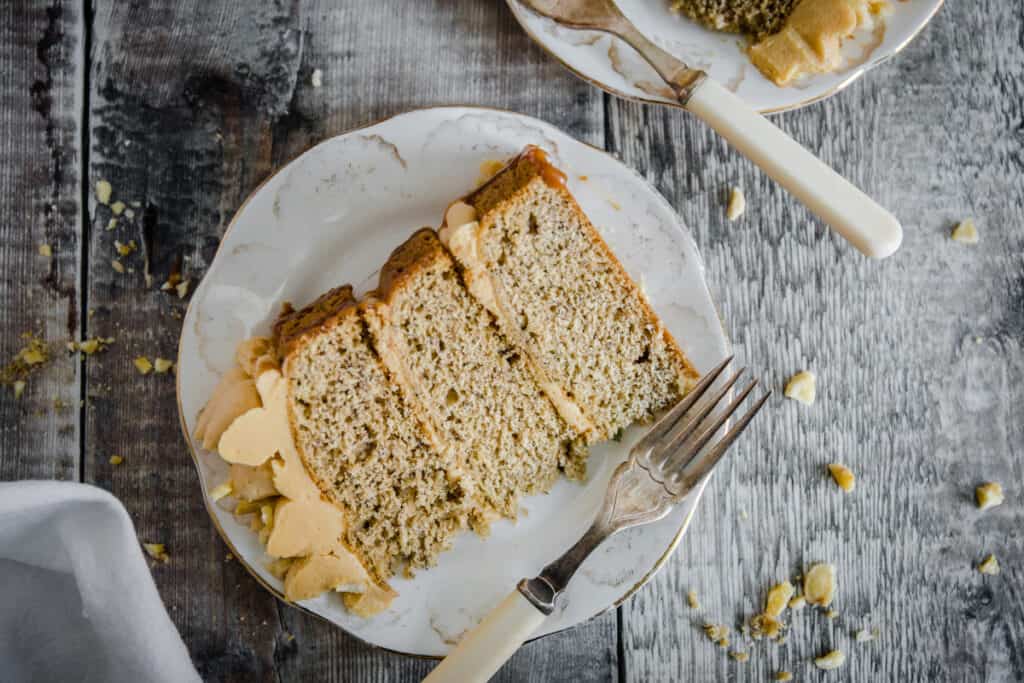
This Gluten-Free Banana Layer Cake is so easy to make and the sponge itself is incredibly simple. It helps that the only gluten-free flour we need is cassava flour (no xanthan gum!) with some ground almonds also stirred in to stabilise our cake which results in a gorgeous soft sponge.
The ease of the sponge gives us a little luxury of time to spend making our indulgently flavourful buttercream using a homemade toffee sauce. Even though it is a Sticky Toffee Buttercream it is not as sweet as you may think thanks to using the ermine buttercream method. This buttercream has a couple of extra steps but the results make it worth the small amount of extra effort.
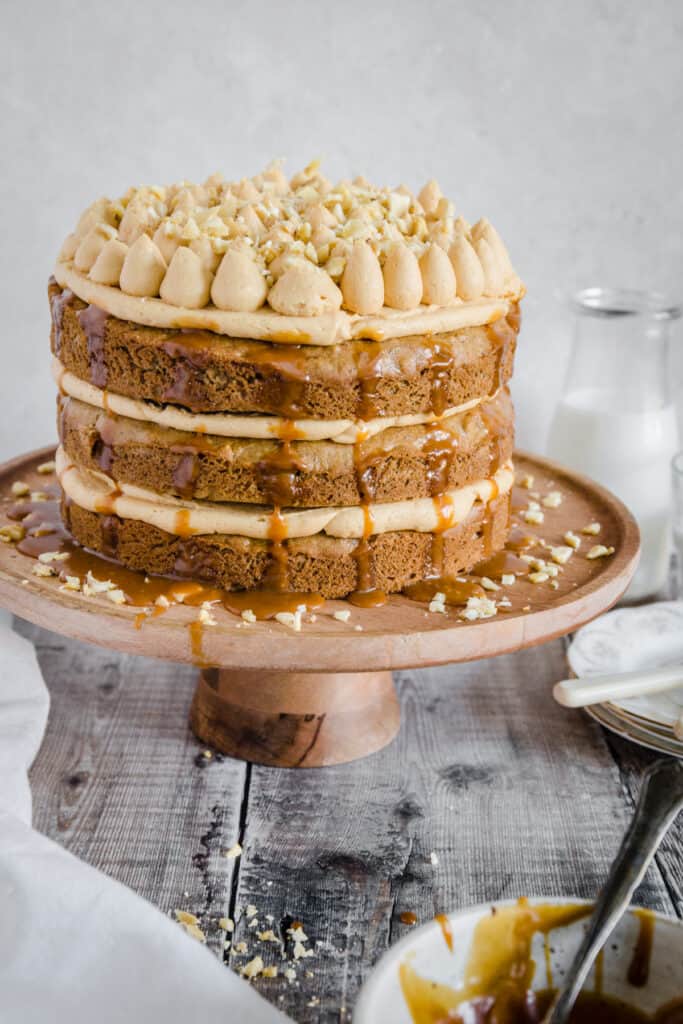
Table of contents
- Why you'll love this recipe
- Watch to see how to make it
- What is Ermine Buttercream?
- Gluten-free flours required
- Cassava Flour
- Ground Almonds
- Ingredients needed
- For the gluten-free banana cake
- For the sticky toffee ermine buttercream
- Step-by-step instructions
- How to make the gluten-free banana sponge cake
- How to make the sticky toffee ermine buttercream
- How to make the toffee sauce
- Make the roux
- Whip it together
- Tips and troubleshooting
- Toffee sauce
- Roux
- Buttercream
- Assembly
- Shop the recipe
- Make in advance
- How to store leftover cake
- How to freeze
- More gluten-free cake recipes you'll love!
Why you'll love this recipe
- Ultra flavourful banana sponge cake packed with lovely bananas, vanilla and a gentle spicing.
- Easy 1-2 bowls sponge cake which doesn't need a stand mixer.
- Cassava flour. This is the only gluten-free flour needed for this recipe.
- Ground almonds make this cake deliciously moist.
- No xanthan gum. It's not needed and your cake will still be light, fluffy and not crumble apart. READ MORE >>> Why I never bake with xanthan gum
- Sticky toffee ermine buttercream. A beautifully tasting smooth creamy buttercream which is the perfect flavour finish to the cake.
- Gluten-Free Banoffee Cake. If you are looking for this kind of flavour then this cake has all the elements of a cake version of banoffee pie that you are looking for.
Watch to see how to make it
What is Ermine Buttercream?
If you have never made an ermine buttercream before (it is sometimes called cooked flour buttercream or boiled milk frosting) then you may be surprised at the method.
Ermine buttercream requires flour and milk to be heated and whisked together to create a thick roux the consistency of pudding. It is then whipped with butter and sugar to create a light, smooth and incredibly creamy filling or frosting which is not too sweet.
The Ermine Buttercream used for this Gluten-Free Sticky Toffee Cake also whips in a homemade toffee sauce for the most gorgeous rich caramel flavour.
Gluten-free flours required
Cassava Flour
This is an incredibly useful starchy flour which is great in all kinds of baking. Here we use it in the sponge cake itself and in our ermine buttercream.
Cassava flour gives our sponge and great bounce and help the ingredients stick together without that pasty feel which can be a problem in gluten-free baking.
It also thickens and created a beautifully smooth roux (no graininess at all!) which is a perfect choice for making our ermine buttercream.
This cake has not been tested with a cassava flour substitute.
Ground Almonds
The ground almonds give the cake a great structure and moisture content so the sponge is soft and beautifully textured.
Flour substitutions. If you are able to use ground almonds then I seriously recommend you stick to them. However, if you need to be aware of allergies then you can replace the ground almonds with gram flour (aka chickpea flour/besan).
Ingredients needed
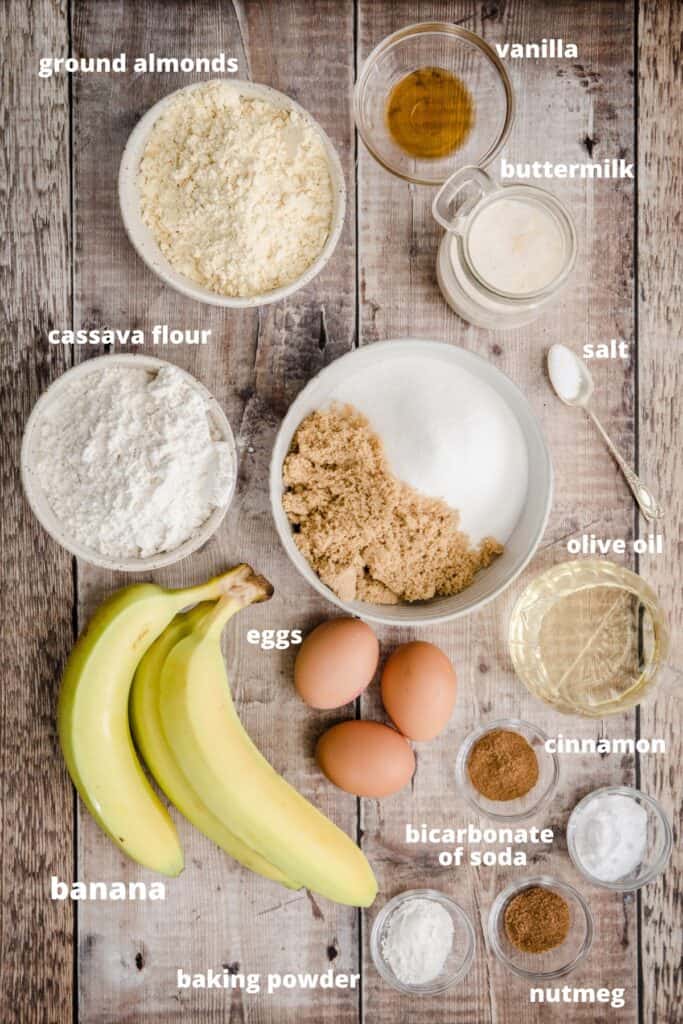
For the gluten-free banana cake
- Sugar. We use a mix of brown sugar and caster sugar so we get a lovely toffee flavour but also lightness from the white sugar.
- Eggs. This cake was developed using medium sized eggs, 60g each. If you don't have access to medium eggs then go by the weight which totals 180g.
- Buttermilk. If you can't get hold of buttermilk (I never can!) then you can use 100ml whole milk + 1 teaspoon apple cider vinegar stirred together.
- Olive oil. Use mild light flavourless olive oil.
- Bananas. This recipe uses 3 which totals about 400g unpeeled. The browner your banana the sweeter your cake will be.
- Vanilla extract. Use the best quality you can. I like the Nielssen Massey brand.
- Ground almonds. You can use almond flour.
- Cassava flour. I don't recommend substituting this flour.
- Raising agents. This recipe uses both baking powder and bicarbonate of soda for rise and a tender crumb.
- Spices. This sponge cake is flavoured with ground cinnamon and nutmeg.
- Salt. Kosher salt is my preferred choice for baking. Try not to use table salt as it has a harsh flavour.
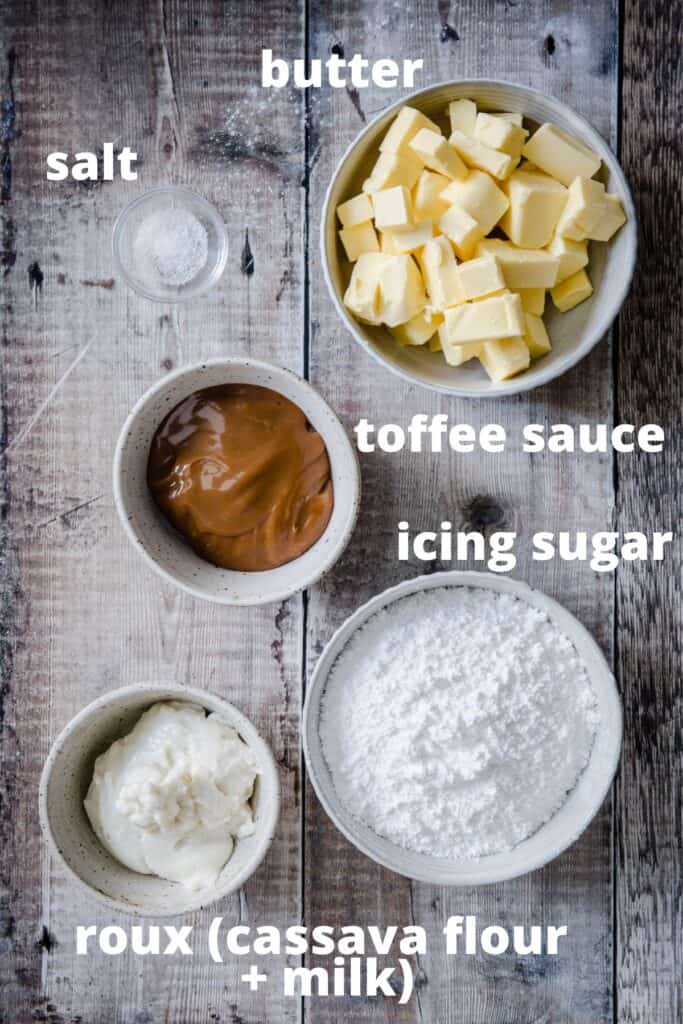
For the sticky toffee ermine buttercream
- Caster sugar. This is the base of the toffee sauce. You can use any granulated white sugar.
- Double cream. Cream is mixed into the melted sugar to make the toffee sauce. Make sure it is at room temperature.
- Butter. Unsalted butter is added to the toffee sauce. Make sure it is at room temperature.
- Cassava flour. This is used to make a roux which is the unique selling point of our ermine buttercream. This is the same flour used as the sponge cake. It thickens very well with the milk to form a smooth roux.
- Milk. Mixed with the cassava flour to form a roux. This cake was tested using whole milk.
- Butter. Use unsalted butter at room temperature.
- Icing sugar. (powdered sugar)
- Salt. Imperative in balancing out the sweetness of the buttercream.
- Banana chips. Just enough for crushing sprinkling on top of the finished cake for a little crunch.
Step-by-step instructions
For full recipe instructions go to the recipe card at the end of this post.
How to make the gluten-free banana sponge cake
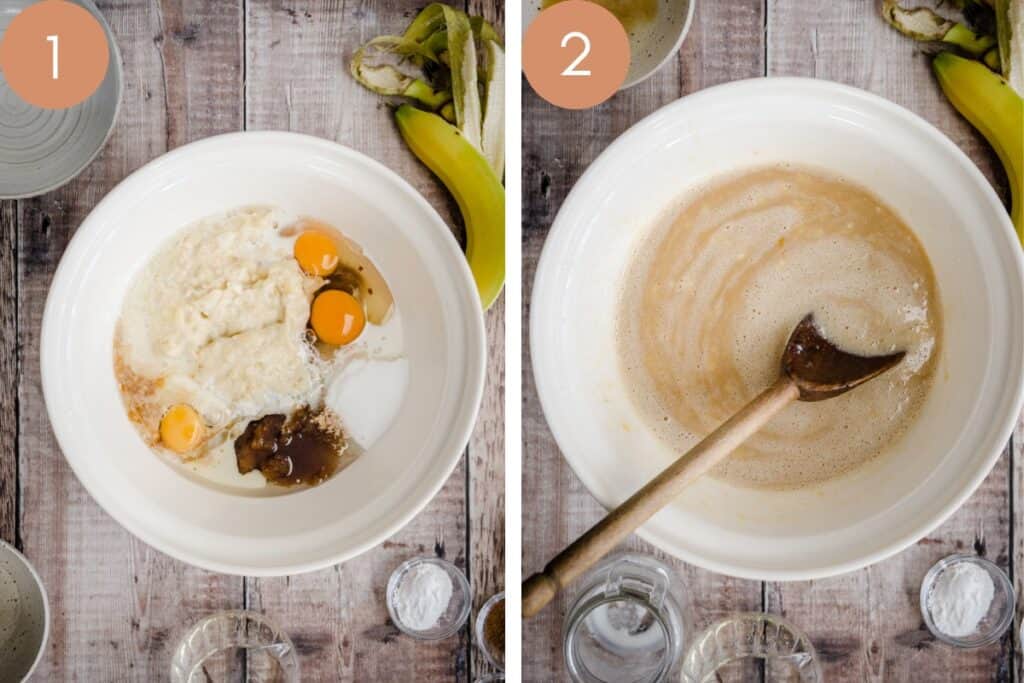
Wet ingredients. Beat the sugars, eggs, buttermilk and olive oil. Mash the bananas well then add in along with the vanilla.
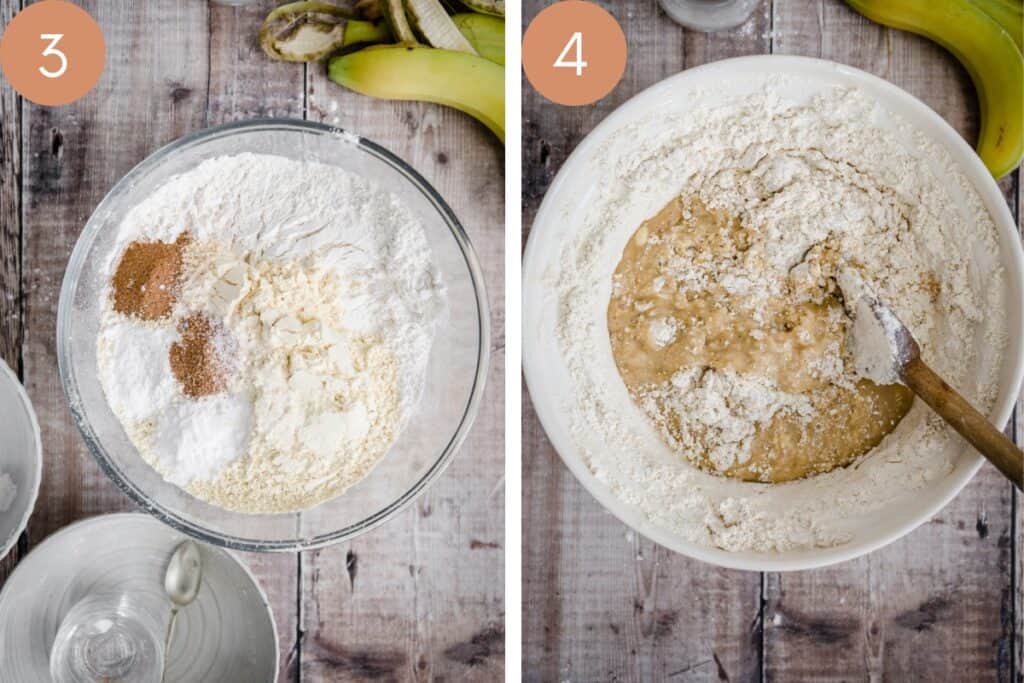
Dry ingredients. Whisk together the cassava flour, ground almonds, baking powder, bicarbonate of soda, cinnamon, nutmeg and salt.
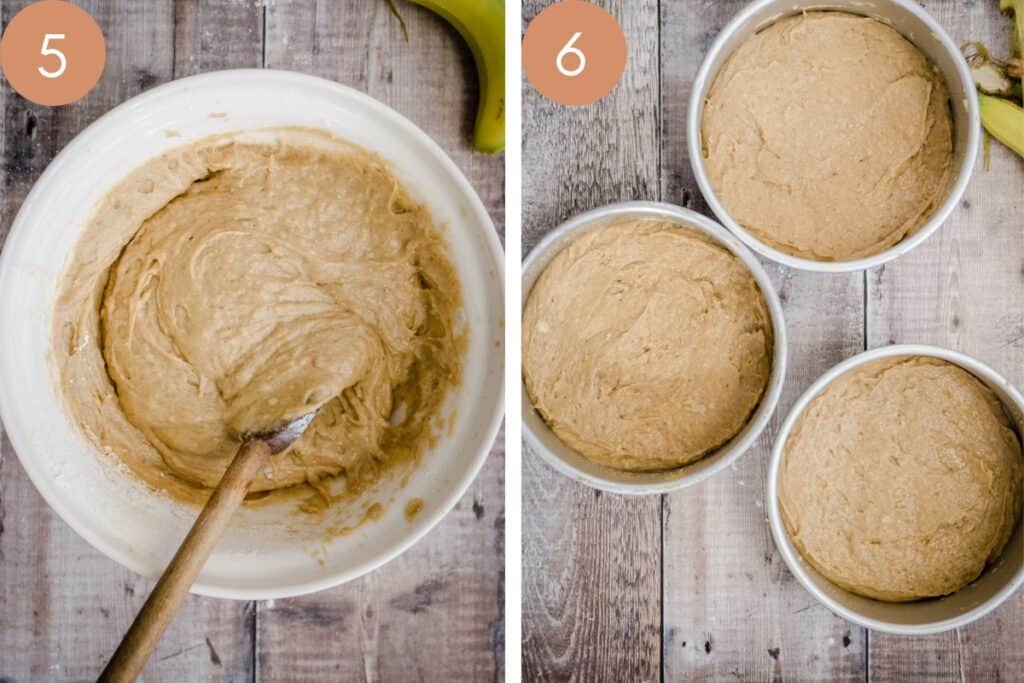
Mix. Add the dry ingredients to the wet ingredients and mix together until just incorporated.
Bake. Divide between three sandwich tins and bake for 20 minutes.
How to make the sticky toffee ermine buttercream
There are 3 stages in making this buttercream:
- Make the homemade sticky toffee sauce.
- Make the roux with just cassava flour and milk.
- Whip butter and icing sugar with the toffee sauce and the roux.
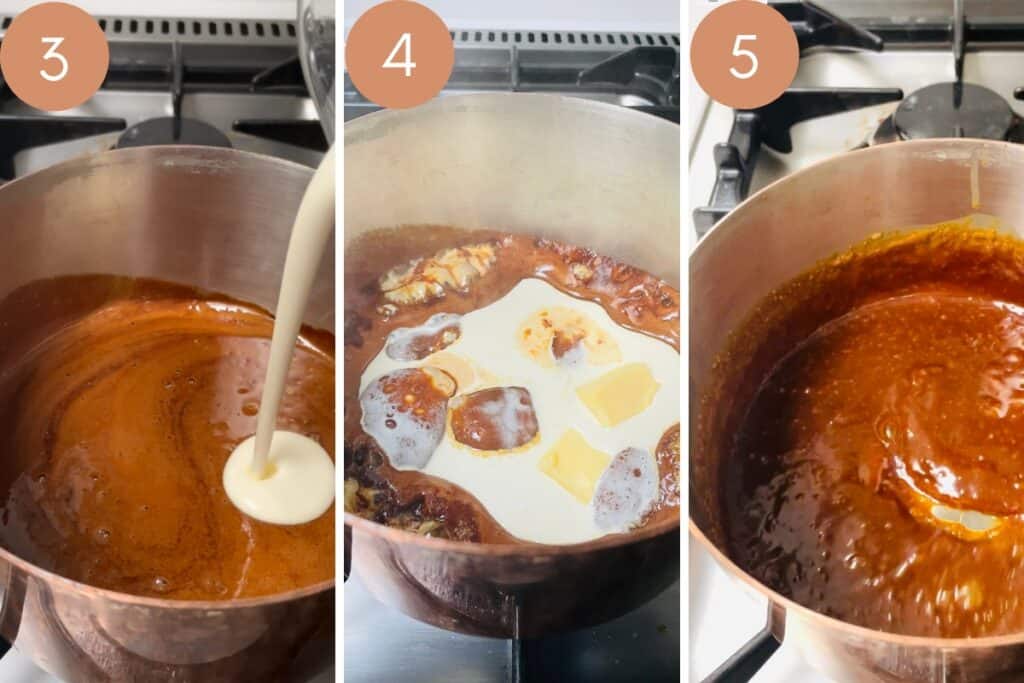
How to make the toffee sauce
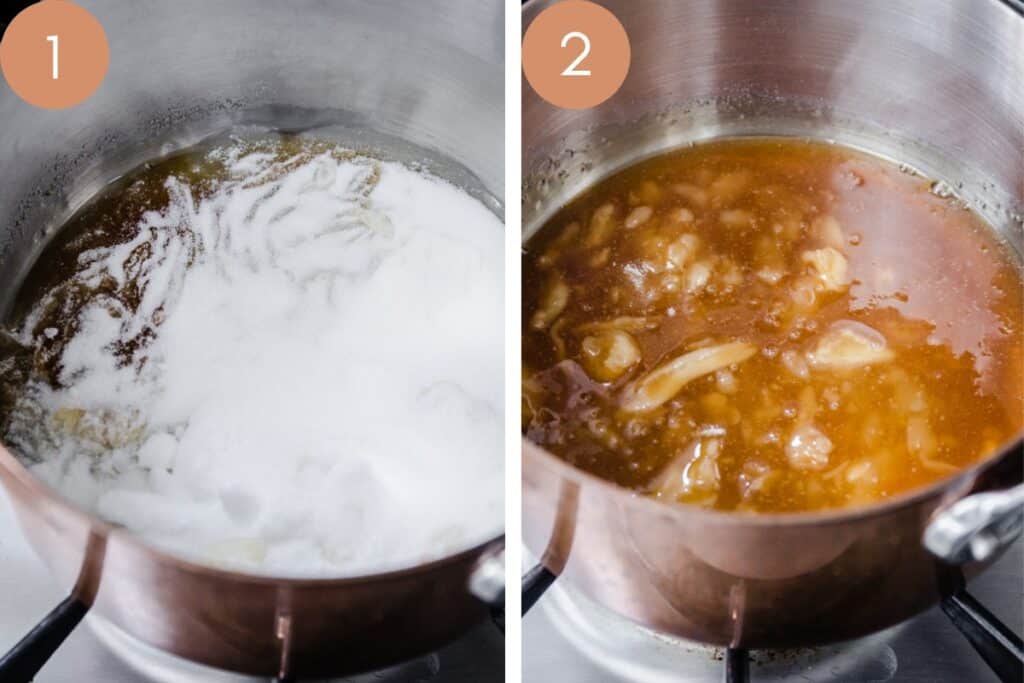
Heat the sugar in a medium sized saucepan until the sugar has completely melted and turned a dark golden brown.
Pour in the cream and butter, be careful as it will dramatically bubble right up the pan.
Stir it all together and it will quickly form a thick silky toffee sauce. Remove from heat and allow to cool.
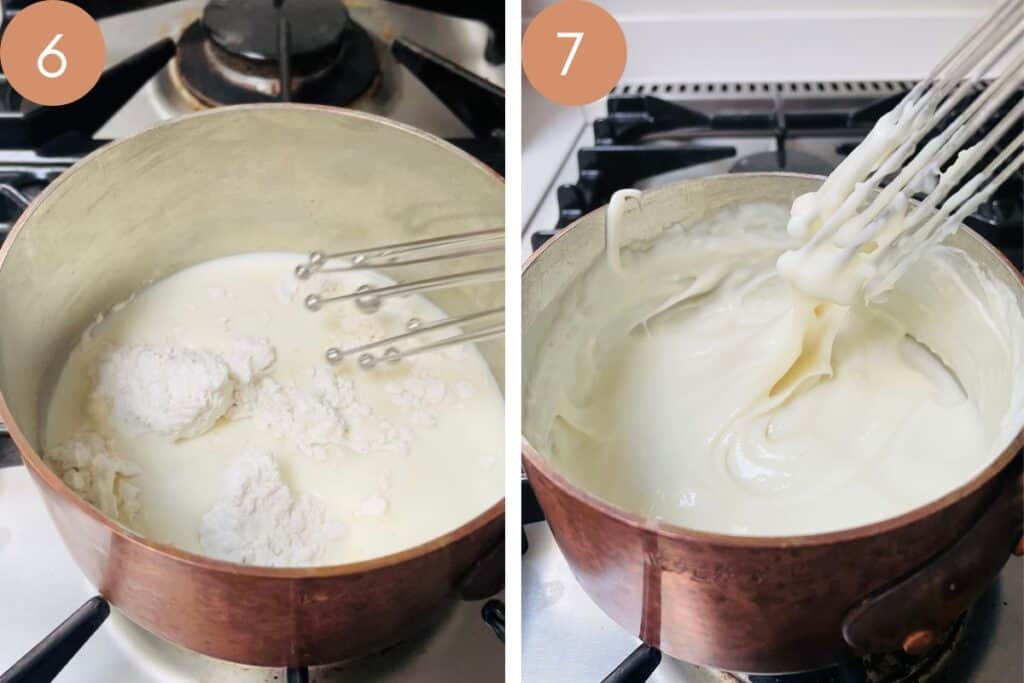
Make the roux
Whisk together the cassava flour and milk in a medium sized saucepan until smooth. Turn the heat on and whisk continually until the roux has thickened and is started to bubble. Remove from heat and allow to cool
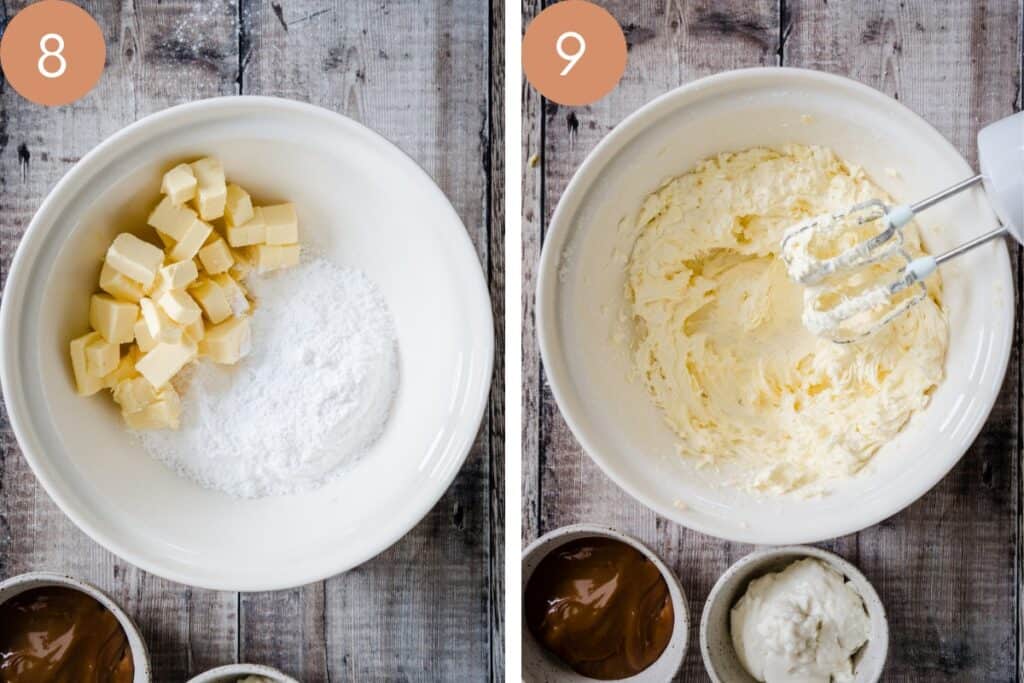
Whip it together
Beat butter and icing sugar for 5 minutes until light and fluffy.
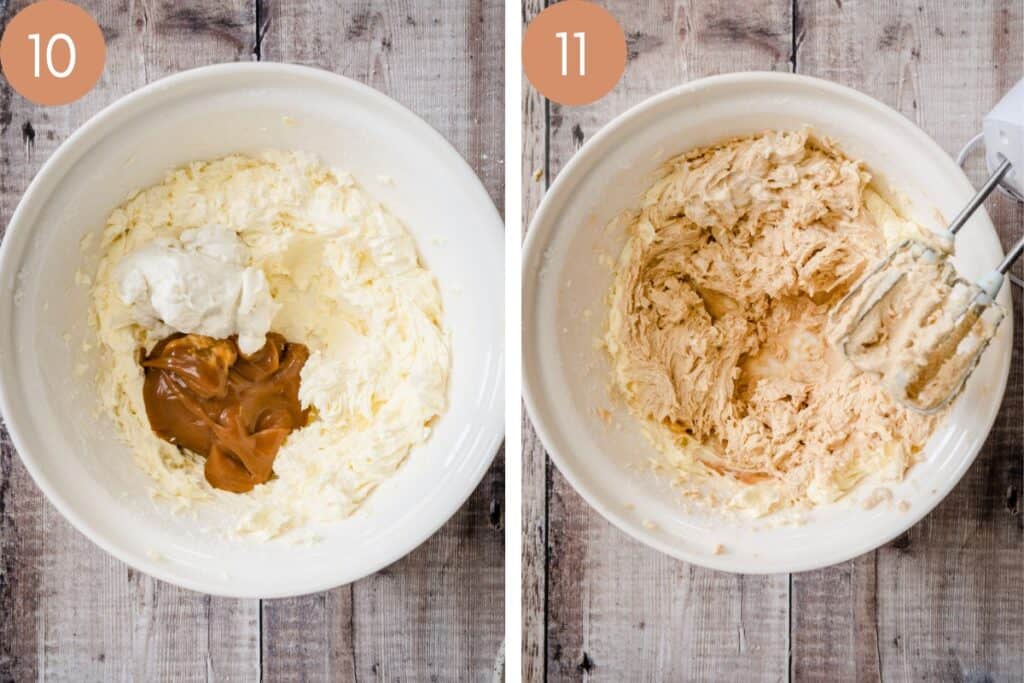
Add ¾ of the toffee sauce and the roux and beat until completely combined.
Tips and troubleshooting
Toffee sauce
- If you don't want to make your own toffee sauce you can use either store bought dulce de leche or Carnations Caramel. The buttercream is just as good but really it's no bother to make your own.
- I recommend making the toffee sauce the night before as you want it to chill and thicken before using it to make the buttercream. However, if you don't have time then you can place in the freezer for 1 hour, stirring every 20 minutes where it will reach the desired thick consistency.
- Melt the sugar in an even layer in the saucepan so that it melts evenly too.
- Do not stir the sugar as sugar crystals will form. Gently swirl the pan around every so often to encourage the sugar to melt.
- Never leave sugar alone to melt. Guaranteed it will burn if you take your eyes off it for a second.
- As soon as all the sugar has melted then add the double cream and butter so the sugar doesn't burn.
- Your double cream and butter should be at room temperature to avoid the sugar from seizing.
- Use a silicone spoon at this stage to stir in the double cream and butter.
Roux
- I also recommend making ahead as you need the roux to be completely cooled before you add to the buttercream.
- If you find your roux is a little lumpy as it thickens then push through a fine mesh strainer for a really smooth texture.
Buttercream
- I do recommend using either a stand mixer or an electric beater to beat the butter and icing so it gets very light and fluffy. It takes about 5 minutes to get to this stage.
- When adding the roux and the buttercream make sure your mixer is on its lowest setting as you don't want to be whipping too much air into it.
- If there are lots of air bubbles when you have mixed your buttercream then use a wooden spoon a beat the buttercream down, smoothing it out to remove the air bubbles.
Assembly
- Use a cake board to place the first sponge cake on. This will help if you want to move the cake, rather than decorating it directly onto a cake stand or plate.
- To create even buttercream layers between your sponges then pipe your buttercream over the sponge layers in concentric circles and smooth out with a palette knife. Use a piping bag fitted with a large #1A piping tip.
- Use ¼ of the buttercream for piping over each of the sponge layers, this leaves ¼ buttercream for decorative piping on the top of the cake.
- Use the excess toffee sauce for spooning over your finished banana cake. You may need to warm it up for a second or two to make it easier to drip.
- Crumble some finely diced banana chips over the finished cake for a little extra finish and crunch.
Shop the recipe

Cassava Flour
Buy Now →
8in Cake Tin
Buy Now →
Fine Mesh Sieve
Buy Now →
Silicone Spatula
Buy Now →
Disposable Cake Boards
Buy Now →
13in Offset Spatula
Buy Now →
Recyclable Piping Bags
Buy Now →
1A Piping Tip
Buy Now →Make in advance
You can make the sponge layers up to 2 days before you serve the cake. Store the sponges at room temperature in an airtight container.
I recommend to make the toffee sauce and the roux for the ermine buttercream the day before you wish to decorate the cake so they are fully chilled before using.
Fill and decorate the cake with the buttercream on the day you plan to serve the cake.
How to store leftover cake
This cake can be stored at room temperature up to 3 days in an airtight container in a cool room. You can store in the fridge but the sponge is not covered and will dry out quickly.
How to freeze
You can freeze the sponge cake layers before you decorate the cake. Wrap the layers individually in cling film and aluminium foil to avoid freezer burn. Freeze for up to 2 months. Allow to defrost fully at room temperature before unwrapping and filling with buttercream.
The best way to freeze leftover cake is in slices. Slice the cake and store the slices layered in airtight containers with baking parchment between each layer. The cake slices will freeze well in this way for up to a month. Allow each slice to defrost at room temperature for 2 hours before serving.
More gluten-free cake recipes you'll love!
- Banana Rum Caramel Cake
- Gluten-Free Hummingbird Cake
- Salted Caramel Chocolate Espresso Cake
- Gluten-Free Strawberry Cake
- Lemon Caramel Cake
- Gluten-Free Lemon Blueberry Cake
- Gluten-Free Chocolate Fudge Cake
- Lemon Curd Cake
- Best Gluten-Free Vanilla Cake
- Gluten-Free Carrot Cake
- Lemon Raspberry Cake
I urge you to give this Gluten-Free Sticky Toffee Banana Cake a try. If you do then please leave a comment below and give the recipe a rating which helps others find the recipe on Google . If you then go on to use this recipe as a launch pad for your own culinary creation then I'd also love it if you'd share it and tag me on Instagram. It is so lovely for me to see your versions and variations of my recipes.

Gluten-Free Sticky Toffee Banana Cake
This 3 layer Gluten-Free Sticky Toffee Banana Cake is a real showstopper of a cake. Enjoy a fluffy and gently spiced banana sponge cake filled and decorated with a gorgeously light and silky ermine buttercream infused with rich toffee sauce.
Prep Time 35 mins
Cook Time 35 mins
Chilling time 6 hrs
Course Cake
Cuisine British
Servings 16 servings
Calories 626 kcal
- 150 g soft light brown sugar
- 150 g caster sugar
- 3 eggs - medium, 60g each
- 100 ml buttermilk
- 120 ml light olive oil
- 3 bananas - 400g
- 1 teaspoon vanilla extract
- 325 g cassava flour
- 200 g ground almonds
- 2 teaspoon baking powder
- 1 teaspoon bicarbonate of soda
- 1 teaspoon cinnamon
- ½ teaspoon nutmeg
- ½ teaspoon salt
Sticky Toffee Ermine Buttercream
- 225 g double cream
- 160 g caster sugar
- 30 g butter
- 30 g cassava flour
- 250 ml whole milk
- 300 g unsalted butter
- 200 g icing sugar
- ½ teaspoon salt
- 25 g banana chips - finely chopped
-
Pre-heat oven to 180°C / 160°C fan / gas mark 4 and line and grease three 20cm sandwich tins.
-
In a large mixing bowl beat the sugars, eggs, buttermilk and olive oil.
-
Mash the bananas well then add them to the mixing bowl along with the vanilla.
-
Whisk together the cassava flour and ground almonds in a large bowl with the baking powder, bicarbonate of soda, cinnamon, nutmeg and salt.
-
Add the dry flour mix into the mixed wet ingredients and beat together until just incorporated.
-
Pour evenly into the three sandwich tins and bake in the oven for 20 minutes until golden and an inserted toothpick comes out clean.
-
Turn each cake out of the tin onto a cooling rack and leave to cool to room temperature.
Sticky Toffee Ermine Buttercream
Toffee Sauce
-
Pour the caster sugar into a medium sized saucepan into an even layer and heat on a gentle temperature as the sugar begins to melt.
-
Avoid moving the sugar around too much but you can encourage an even melting by gently shaking the actual saucepan around occasionally if you need to. Keep a careful eye on the sugar and do not leave at all.
-
As the sugar has melted it will turn a dark golden tan colour. Watch to make sure it doesn't get too browned as this means it's burning.
-
As soon as the sugar has melted and has turned that dark golden tan colour then pour in the double cream and the butter. It will rise dramatically up the saucepan so stand back at first for safety.
-
Stir the cream and butter into the melted sugar and it will form a thick silky toffee sauce.
-
Remove from the heat and pour the toffee sauce into a bowl and chill thoroughly before using.
Roux
-
Whisk the cassava flour and 100ml of the milk in a medium sized saucepan (no heat) until smooth.
-
Turn the heat on low and whisk continually until the mixture has thickened.
-
Gradually add the rest of the milk in a slow stream, whisking hard continuously to avoid any lumps which are quick to form.
-
As soon as the mixture reaches a boil and has thickened then remove from the heat immediately and continue whisking for a couple of minutes to remove all the lumps. Strain then leave to cool completely.
Buttercream
-
Mix the butter with the icing sugar in a large bowl with an electric beater or stand mixer. Cream for about 5 minutes until very light, pale and fluffy. Scrape the sides of the bowl down every so often to ensure even mixing.
-
Add ¾ of the cooled toffee sauce, the cooled roux and salt then mix again on a low speed until smooth and just combined.
Assembly
-
Place one of the cake sponges onto a cake board.
-
Transfer the buttercream to a piping bag fitted with a 1A piping tip. Pipe ¼ of the buttercream around the surface of the cake sponge in concentric circles to create an even layer of buttercream. Use a palette knife to smooth it.
-
Place the second cake sponge on top of the buttercream. Pipe around ¼ of the buttercream and smooth as before.
-
Place the final cake sponge on top of the buttercream. Pipe around ¼ of the buttercream and smooth as before.
-
Drip the rest of the toffee sauce down the edges of the cake, warming the toffee sauce slightly if it's a bit solid.
-
Decorate the top of the cake by piping simple buttercream drops across the surface using the last ¼ of the buttercream.
-
Finally scatter chopped banana chips over the top.
Ingredient Substitutions
- Cassava flour. This recipe has not been tested with any substitutes.
- Ground almonds. If you suffer from a nut allergy then you can substitute with gram flour.
- Buttermilk. If you can't get hold of buttermilk then you can use 100ml whole milk + 1 teaspoon apple cider vinegar stirred together.
- Double cream. Substitute with heavy cream
- Sticky Toffee Sauce. Instead of making the toffee sauce you can substitute for dulce de leche or Carnations Caramel.
Tips and Troubleshooting
My post includes many tips to ensure this recipe is utterly foolproof for you.
- Eggs. If you can't get the right sized eggs for the recipe then it is best to go by weight.
- Bananas. The more ripe the bananas the sweeter the sponge will be.
- Buttercream. Try not to stir the toffee sauce and never leave it alone in the pan. Sieve the roux to remove any lumps. Mix the buttercream on a low speed to avoid air bubbles. If you are still getting air bubbles then mix by hand to smooth them out.
Make Ahead
I recommend you make the toffee sauce and the roux for the buttercream the day before to give them ample time to cool. You can make the sponge cakes the day before too. Keep in an airtight container at room temperature until needed.
Storing
This cake can be stored at room temperature up to 3 days in an airtight container in a cool room. You can keep in the fridge but the sponge is not covered and will dry out quickly.
Freeze
You can freeze the banana sponge layers without the buttercream by wrapping each in plastic wrap and aluminium foil and freezing for up to 2 months. Defrost at room temperature overnight before unwrapping and decorating with the buttercream.
Ingredient measurements
Please note that the US customary measurements for the ingredients provided are based on a conversion calculator. This recipe was tested with metric measurements and I recommend using a digital scale to weigh ingredients for the most accurate results. READ MORE >>> Why you should always weigh vs measuring with cups
Nutrition Information
Please note that the nutrition information provided below is an estimate based on an online nutrition calculator. It will vary based on the specific ingredients you use. Please seek a professional nutritionist's advice for further clarification. The nutrition serving is for 1 slice of cake, assuming the cake is cut into 16 servings.
Calories: 626 kcal Carbohydrates: 70 g Protein: 6 g Fat: 38 g Saturated Fat: 16 g Polyunsaturated Fat: 2 g Monounsaturated Fat: 12 g Trans Fat: 1 g Cholesterol: 97 mg Sodium: 265 mg Potassium: 213 mg Fiber: 3 g Sugar: 46 g Vitamin A: 818 IU Vitamin C: 3 mg Calcium: 136 mg Iron: 2 mg
Head to the comment section and let me know what you think!
gluten free mango cake recipe better homes and gardens
Source: https://fromthelarder.co.uk/sticky-toffee-banana-cake/
Posted by: levittaphism.blogspot.com
0 Response to "gluten free mango cake recipe better homes and gardens"
Post a Comment